Enterprise-Ready Kubernetes at Home for About CHF 1,000
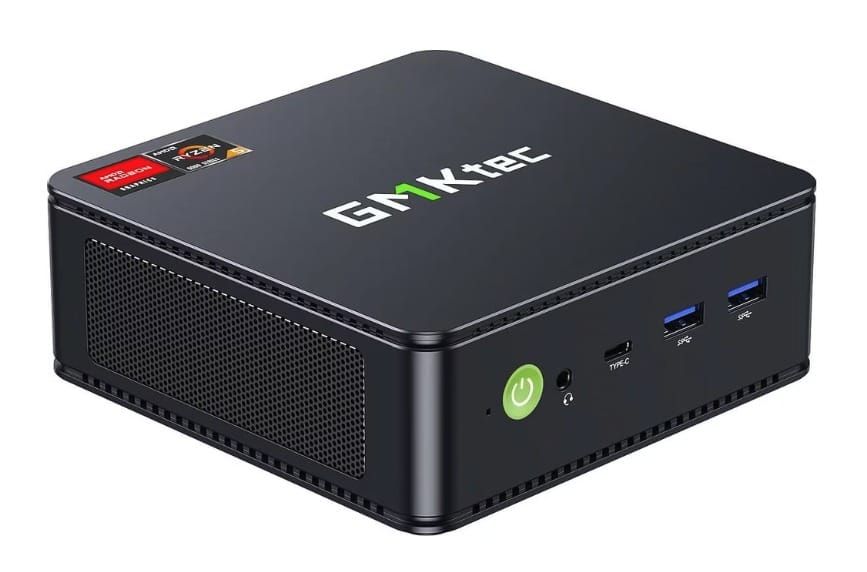
"You don't need a cloud contract to run Kubernetes properly. Three mini PCs give you a real HA control plane, replicated storage and zero open ports. Take your monthly bill and calculate the difference. Startups, take note."
— Roman Hüsler, opensight.ch
TL;DR — Three amd64 nodes, one certified Kubernetes distribution, and a tunnel that dials outward instead of a port that sits open. Two Ryzen mini PCs and a desktop that was already gathering dust give you a genuine high-availability control plane, replicated storage and GitOps for roughly the price of four months of the equivalent managed cluster. No Raspberry Pi, no public IP, and nothing forwarded through the firewall.
Every couple of months a home-lab build does the rounds on LinkedIn, and the comments split into the same two camps: people who think a cluster at home is a toy, and people who think a Raspberry Pi is a server. Both are wrong in interesting ways, and the second one is expensive.
Here is the build I would actually put together — and, more usefully, the reasoning behind each choice, including the parts I deliberately left out.
- The design brief
- Why there is no Raspberry Pi in this build
- The hardware
- Why K3s, and why exactly three servers
- Reaching it from the internet without opening a port
- What pfSense is actually for here
- Storage that survives a dead node
- GitOps, secrets and certificates
- Observability
- What I deliberately left out
- What it costs to leave running
- Scaling up, scaling out, and going hybrid
- Key takeaways
The design brief
"Home lab" covers everything from a single Docker host to a rack in the garage. The constraint that makes this build interesting is that it has to behave like something you would hand to a customer:
- A real control plane. Three API servers, not one master with a sticky note on it.
- Reachable from the internet — without a public IP, a dynamic-DNS script, or a forwarded port.
- Storage that survives a node dying, because a node will die and it will be the one with the database on it.
- Reproducible from Git. If I cannot rebuild it from a repository, it is a pet.
- Quiet, cool and cheap to run — it lives in a flat, not a data centre.
Everything below follows from those five. If your constraints differ, your build should too. If you are earlier in the journey than this, start with What is Kubernetes and come back.
Why there is no Raspberry Pi in this build
This is where I part company with most of the builds you will read, so let me be concrete rather than snobbish.
A Pi 5 with 8 GB is a lovely machine. But by the time you have added a decent power supply, an NVMe hat, an SSD and a case, you are within touching distance of a used Ryzen mini PC that gives you four times the RAM, a real M.2 slot on a real PCIe lane, and — the part that actually matters — the same CPU architecture as everything else in the cluster.
Three specific problems come with mixing a Pi into a general-purpose cluster:
- The arm64 long tail. The big charts are multi-arch now. The one operator you actually need on a Tuesday evening is not, and you find out during
helm install. - Scheduling by hand. A mixed-architecture cluster means node affinities and tolerations on workloads that should not need to care where they run. That is homework, not a home lab.
- I/O. Replicated block storage is unforgiving about disk latency, and so is etcd. SD cards and USB enclosures are the wrong end of that trade.
None of this makes the Pi a bad computer. It makes it a bad general-purpose cluster node. As a dedicated DNS resolver, a monitoring probe on the other side of the flat, or a serial console — excellent, and I would still buy one. Just not for this.
The hardware
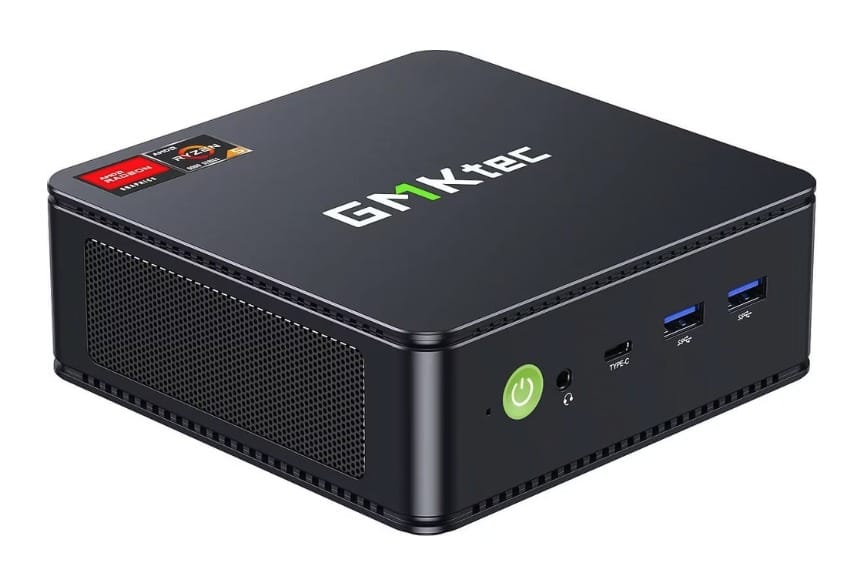
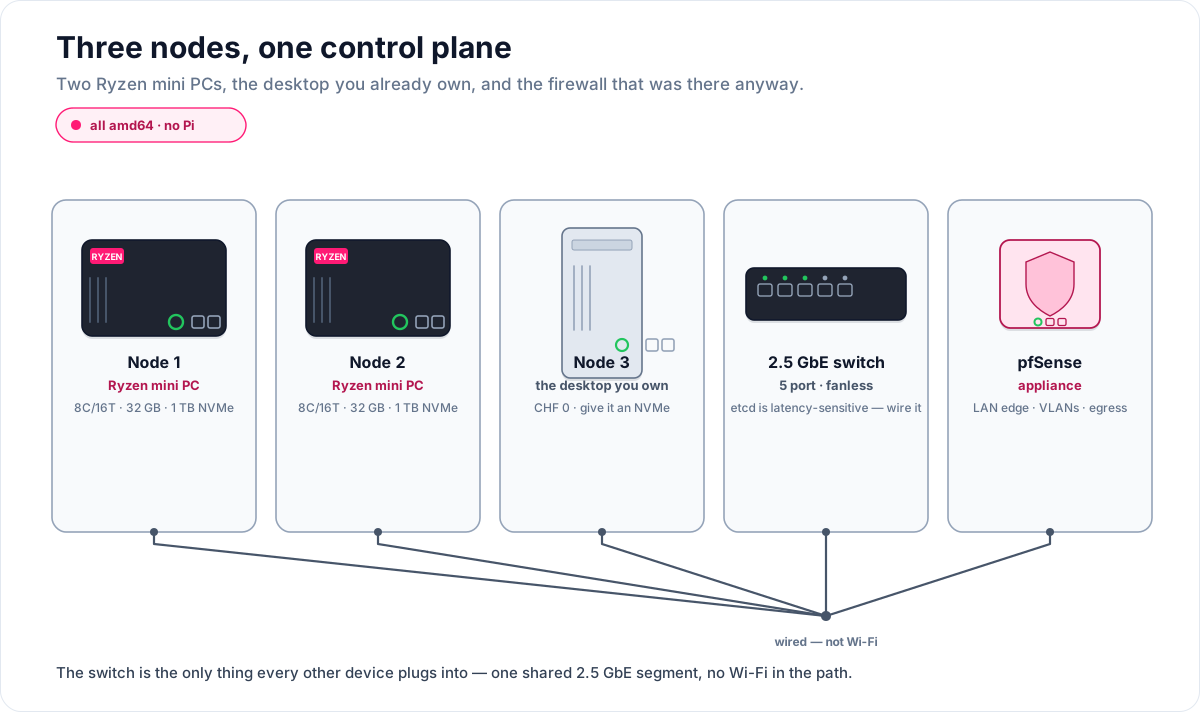
Three nodes, and the third one is free because you already own it. That desktop in the cupboard — the one you stopped using when the laptop got good enough — is very probably a quad-core with 16 GB of RAM and a spare M.2 slot. That is a perfectly respectable Kubernetes node.
| Part | Spec | Indicative price |
|---|---|---|
| Node 1 — Ryzen mini PC | 8C/16T, 32 GB DDR5, 1 TB NVMe | CHF 350–550 |
| Node 2 — Ryzen mini PC | 8C/16T, 32 GB DDR5, 1 TB NVMe | CHF 350–550 |
| Node 3 — the desktop you own | whatever it is, plus an NVMe drive | CHF 0–80 |
| 2.5 GbE switch | 5 port, fanless | CHF 50–80 |
| pfSense appliance | already at the edge of the network | CHF 0 |
| New spend | ≈ CHF 800–1,200 |
Two honest notes on that table. First, the spread is real: mini-PC pricing swings hard by generation, and last year's Ryzen at 32 GB is the sweet spot rather than this year's at 16 GB. Buy RAM over clock speed — you will run out of memory long before you run out of cores. Second, prices move; check them yourself rather than trusting a table on a blog, including this one.
Wire the three nodes to the switch. Wi-Fi is fine for your laptop and a bad idea for a distributed consensus protocol.
Why K3s, and why exactly three servers
K3s is a CNCF-certified Kubernetes distribution — the same API, the same manifests, the same kubectl. What it removes is operational surface: it ships as a single binary, and it brings its own ingress controller, service load balancer, local storage provisioner and Helm controller. On hardware this size, that saves you a weekend and about a gigabyte of RAM.
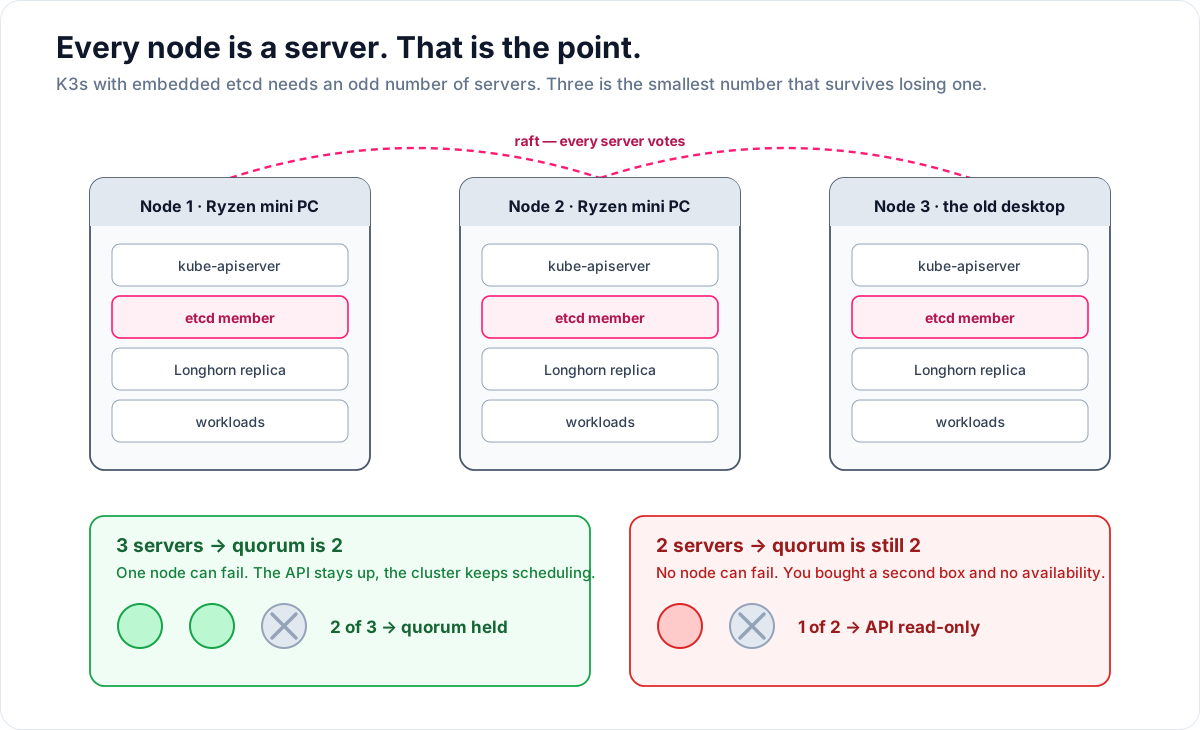
The important design decision is that all three nodes are servers, not one server and two agents. K3s can run its datastore as an embedded etcd cluster, and the K3s documentation is blunt about the constraint: an HA embedded etcd cluster must have an odd number of servers, because quorum for n servers is (n/2)+1.
Do that arithmetic for two servers and you get the result that surprises people: quorum is still 2, so a two-server cluster tolerates zero failures. You have bought a second machine and no availability. Three servers give quorum of 2, which means one node can go down — for a failure, or because you are upgrading it — and the cluster keeps serving.
Bootstrap the first node:
curl -sfL https://get.k3s.io | sh -s - server \
  --cluster-init \
  --write-kubeconfig-mode 644
Grab the join token, then bring up the other two as servers as well:
# on node 1
sudo cat /var/lib/rancher/k3s/server/node-token

# on nodes 2 and 3
curl -sfL https://get.k3s.io | sh -s - server \
  --server https://192.168.20.11:6443 \
  --token <token> \
  --write-kubeconfig-mode 644
Check it:
kubectl get nodes
# NAME    STATUS   ROLES                       AGE   VERSION
# k3s-1   Ready    control-plane,etcd,master   4m    v1.33.x+k3s1
# k3s-2   Ready    control-plane,etcd,master   2m    v1.33.x+k3s1
# k3s-3   Ready    control-plane,etcd,master   1m    v1.33.x+k3s1
One gotcha worth stating plainly: etcd writes are fsync-bound. Every server is now an etcd member, including the reused desktop. If that desktop is still booting from the spinning disk it shipped with in 2016, etcd will tell you about it in the logs and the whole cluster will feel sluggish. Put an NVMe drive in it before it joins. That CHF 60 is the highest-leverage money in the entire build.
Reaching it from the internet without opening a port
This is the part most home-lab write-ups get wrong, and it is the part that decides whether the build is "production-like" or just "running at home".
The traditional answer is dynamic DNS plus a port forward, which means a residential IP address with 443 open to the internet, and a reverse proxy whose CVE feed you now have to care about. The better answer is to invert the direction of the connection.
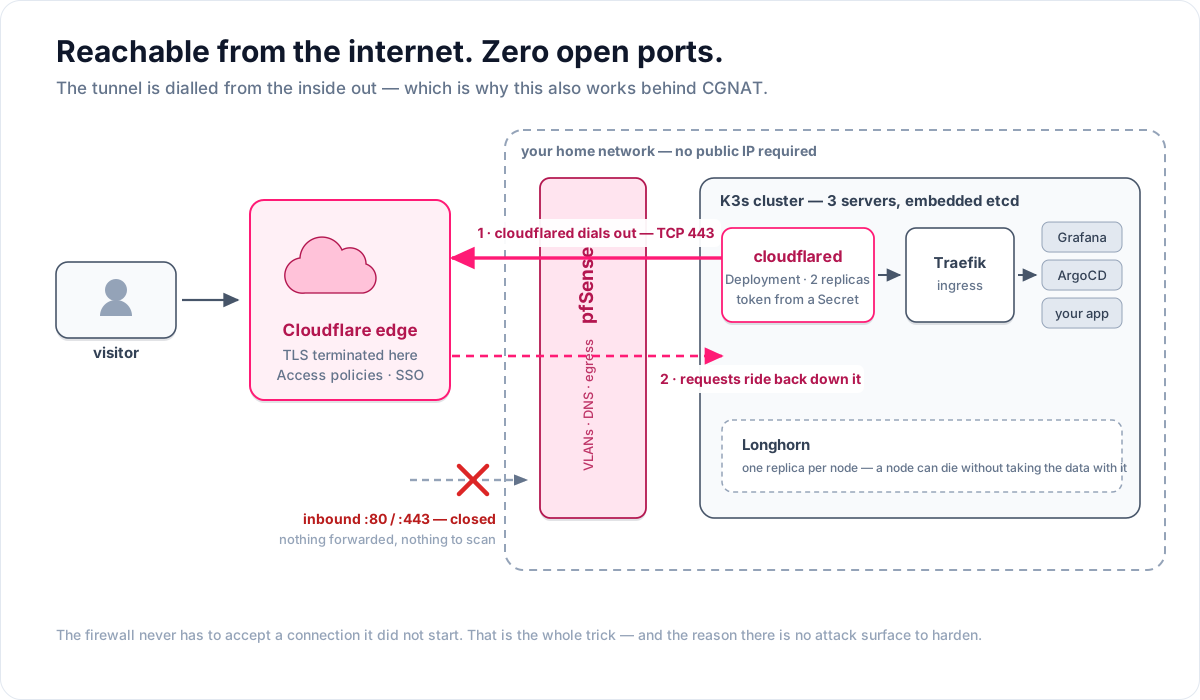
A Cloudflare Tunnel works by running a small daemon, cloudflared, inside your network. It establishes an outbound connection to Cloudflare's edge and requests for your hostname ride back down that connection. Nothing listens on your WAN interface. There is no port forward, no dynamic-DNS script, and no inbound firewall rule — and because the connection is outbound, it works behind CGNAT, which a growing number of Swiss and European connections now are.
Two commercial notes, since they change the calculation: the tunnel itself is free, and Cloudflare's Zero Trust free plan covers up to 50 users. That second point matters more than it sounds. It means you can put an actual identity check in front of your Grafana and ArgoCD dashboards — SSO, not a password in a bookmark — without a licence. For a home lab that is the single biggest security upgrade available for zero francs.
Where to run cloudflared — three options, and the one I would pick
Option A — in the cluster, as a Deployment. My choice. You get two replicas across two nodes for free, the configuration lives in Git with everything else, and the tunnel has the same lifecycle as the thing it exposes.
apiVersion: apps/v1
kind: Deployment
metadata:
  name: cloudflared
  namespace: cloudflare
spec:
  replicas: 2
  selector:
    matchLabels: { app: cloudflared }
  template:
    metadata:
      labels: { app: cloudflared }
    spec:
      topologySpreadConstraints:
        - maxSkew: 1
          topologyKey: kubernetes.io/hostname
          whenUnsatisfiable: DoNotSchedule
          labelSelector:
            matchLabels: { app: cloudflared }
      containers:
        - name: cloudflared
          image: cloudflare/cloudflared:latest
          args: ["tunnel", "--no-autoupdate", "run"]
          env:
            - name: TUNNEL_TOKEN
              valueFrom:
                secretKeyRef:
                  name: cloudflared-token
                  key: token
          resources:
            requests: { cpu: 50m, memory: 64Mi }
            limits:   { memory: 128Mi }
In the Cloudflare dashboard, point the public hostname at your in-cluster ingress service — http://traefik.kube-system.svc.cluster.local:80 — and let Traefik do the host-based routing it is already doing. TLS is terminated at Cloudflare's edge; inside the cluster you are on the pod network.
Option B — on the desktop node, as a systemd service. Simpler to reason about and genuinely fine to start with. But it is a single point of failure sitting outside your GitOps repo, which is exactly the class of thing that is still running six months later with a config nobody can find.
Option C — on the pfSense box. Architecturally this is the tidy answer: the tunnel terminates at the network edge, where the edge device lives. I went looking for how to do it properly, and the honest finding is that you should not.
There is no official pfSense package for cloudflared. The feature request has been open since August 2023; a developer commented that he had built most of a package but was struggling to get the rc.d start/stop scripts to behave. You can enable the upstream FreeBSD repository on pfSense and install the FreeBSD cloudflared package by hand, and people do — but cloudflared service install is not supported on FreeBSD, so you are hand-rolling the service scripts, and packages installed outside pfSense's own repository are not something firmware upgrades are obliged to preserve.
For a box whose entire job is to be the most boring and most available device on the network, that is a bad trade. If the answer changes and a proper package lands, it becomes the elegant option. Today it is a maintenance liability. The tunnel goes in the cluster.
What pfSense is actually for here
Relieved of tunnel duty, the firewall does the three things that make this "enterprise-ready" rather than merely "working" — and they are the three things home-lab posts skip:
- Segmentation. The cluster gets its own VLAN. It cannot reach the family NAS, the TV, or the printer, and they cannot reach it. When you deploy something off Docker Hub at midnight, this is the control that means it does not matter very much.
- Egress rules. The lab VLAN needs outbound 443 for the tunnel and registry pulls, DNS to the firewall, NTP. That is close to the whole list. Default-deny outbound is annoying for an afternoon and quietly valuable forever.
- Split-horizon DNS. Resolve
*.lab.example.chto the internal ingress address on the LAN, and via Cloudflare from outside. Same URL at your desk and on your phone on mobile data, without hairpinning traffic out to the edge and back.
If you want to go further on hardening what sits behind the ingress, the WAF material still applies: Kubernetes NGINX WAF — ingress hardening with mod_security and OWASP CRS.
Storage that survives a dead node
K3s ships local-path as the default storage class, which writes to the node's own disk. That is fine for scratch and fatal for anything you care about: the volume is pinned to that node, and when the node goes, so does the data.
Longhorn replicates block volumes across nodes. It has two requirements worth knowing before you start: open-iscsi must be installed and iscsid running on every node, and the default replica count of three needs three nodes to schedule onto — which is exactly what we have.
# every node, before installing Longhorn
sudo apt install -y open-iscsi nfs-common
sudo systemctl enable --now iscsid
Then the capacity arithmetic, which is the bit that catches people out: three replicas of everything means 3 TB of raw NVMe gives you roughly 1 TB usable. If that hurts, set the default replica count to 2 — you still survive one node failing, and you get half your disk back. On three nodes I would rather have the capacity.
And the sentence that has to be in every storage section: replication is not backup. Longhorn protects you from a dead disk. It does not protect you from kubectl delete pvc, and it replicates your mistakes at wire speed. Point Longhorn's backup target at object storage and check that a restore actually works — the same discipline as Simple do-it-yourself backup with Google Cloud Storage, one layer down.
GitOps, secrets and certificates
Constraint four was "reproducible from Git", which in practice means ArgoCD and a repository that describes the cluster. Bootstrap ArgoCD by hand once, point it at the repo, and let it manage everything else — including itself. From then on the honest test of the build is whether you can wipe a node, rebuild it, and let reconciliation put it back without you remembering anything.
Two supporting pieces:
- Secrets. Nothing plaintext in Git, ever, including in a private repo. Sealed Secrets is the right first step here — encrypt with the cluster's public key, commit the ciphertext, and only that cluster can open it. Reach for Vault when you actually need dynamic, short-lived credentials rather than encrypted static ones; on three nodes it is a lot of moving parts to run for something Sealed Secrets already does.
- Certificates. Cloudflare terminates TLS at the edge for anything coming through the tunnel, but you still want real certificates internally. cert-manager with the DNS-01 challenge against your Cloudflare zone issues them without exposing anything to the internet — which is the whole reason DNS-01 exists.
If you want the CI half of this story, building containers with GitLab and Kaniko on a private cluster covers building images on the same hardware that runs them.
Observability
Install kube-prometheus-stack and you have Prometheus, Alertmanager, Grafana and the node and control-plane dashboards in one Helm release. On three nodes, watch two things in particular: etcd write latency, which will tell you immediately if one node's disk is the weak link, and Longhorn volume health.
Two things I would set up on day one rather than day ninety. Give Prometheus a Longhorn volume, otherwise every restart throws away your history and you lose the ability to answer "was it always like this?". And put the Grafana ingress behind a Cloudflare Access policy — a dashboard exposed through a tunnel is still exposed.
When the graphs start disappearing at wide time ranges, the explanation is in Advanced Prometheus querying for sparse data. And if you would rather ship telemetry through OpenTelemetry Collectors than scrape everything directly, the cost argument for shaping it at the source is in Cut your observability bill at the source.
What I deliberately left out
The stack lists that circulate on LinkedIn tend to be additive — every tool anyone mentioned is in the diagram. Here is what I would not install on three nodes, and why:
- kube-vip. A floating VIP is the standard answer for a highly available API endpoint. But if every inbound request arrives through the tunnel, there is no ingress VIP to float. It is still worth adding if you want
kubectlto survive losing the specific node your kubeconfig points at — which is a real annoyance, just a smaller one than it sounds. - Rancher. A management UI for a cluster you already manage declaratively from Git is mostly weight. It earns its place when you have several clusters and other people using them.
- A service mesh. Three nodes and a handful of services do not have a service-to-service problem worth an extra control plane. Revisit when you have mutual-TLS or traffic-splitting requirements you can name out loud.
- A second storage system. Longhorn for block, and object storage off-box for backups. Adding MinIO on top of Longhorn on top of NVMe is three layers deep for a lab this size — put the S3 layer where it belongs, off the cluster you are backing up.
Every one of these is defensible in a bigger environment. The discipline is being able to say why each is not here, rather than adding it because the diagram looked sparse.
What it costs to leave running
Purchase price is the number people quote. Running cost is the number that decides whether the thing is still switched on next year — and the arithmetic is simple enough to do for your own hardware:
watts × 24 × 365 ÷ 1000 = kWh per year
kWh per year × your tariff = the bill
Take a plausible set of figures: two mini PCs idling around 15 W each, the old desktop around 50 W because desktop power supplies are inefficient at the bottom of their range, and 5 W for the switch. That is roughly 85 W continuous, or about 745 kWh a year.
What that costs depends enormously on where you live, and in Switzerland the spread is larger than most people expect. For 2026, a household pays anywhere from just under 10 Rp./kWh to more than 43 Rp./kWh depending on the municipality, with the national average about 4 % below 2025. So the same 745 kWh costs roughly CHF 75 a year in the cheapest communes, about CHF 210 at a middling 28 Rp./kWh, and around CHF 325 in the most expensive. Look up your own tariff on the ElCom price portal before you decide whether this build is cheap.
Whichever end you land on, the ratio produces the genuinely useful insight in this whole build: the free node is the expensive one. At those figures the reused desktop draws close to 60 % of the power for a fraction of the compute. It is still absolutely the right call to start with it — it costs nothing and it makes the cluster real today. But when it eventually dies, replace it with a third mini PC rather than another tower. On a mid-range tariff the replacement pays for itself in electricity in about two years, and it is quieter.
Measure yours rather than trusting my figures. A CHF 20 plug-in power meter will tell you more about your build than any blog post can, this one included.
Scaling up, scaling out, and going hybrid
The reasonable objection to everything above is that three nodes in a flat is a demo, not a platform. That holds right up until you need the fourth node — at which point the only question that matters is whether the build grows or gets rebuilt. This one grows, in three moves, and the order of them matters more than any one of them does.
Scale up first, because it is the cheapest move
The first wall on this hardware is memory, not CPU. Kubernetes overcommits CPU happily and memory not at all, so the pod that gets evicted on a Tuesday night is short of RAM. Mini PCs in this class generally take two SODIMMs, which makes 32 GB to 64 GB a screwdriver and twenty minutes — and, more importantly, changes nothing else. No new etcd member, no new failure domain, no rebalancing, no extra consensus latency.
Disk is the same story: a larger NVMe simply gives Longhorn more to work with, and the capacity arithmetic from earlier still applies — at three replicas, every terabyte you add is a third of a terabyte usable. Scale up until the boxes are full. It is the only move on this list that adds capacity without adding something you then have to operate.
Scale out second — and add agents, not servers
When the boxes are full, the instinct is to buy a fourth machine and install it exactly the way you installed the first three. Don't.
The quorum arithmetic does not stop being true above three. K3s requires an odd number of servers for an HA embedded-etcd cluster, and etcd's own guidance is blunter than most people expect: adding a member to bring the cluster to an even number buys no additional fault tolerance at all, and a write is not done until a majority of members has acknowledged it — so every member you add is one more machine a write can end up waiting on. Three servers is a good number. Five is what you move to when you genuinely need to survive two of them failing simultaneously. Seven is the practical ceiling, and you will not reach it in a flat.
So leave the control plane at three and add agents instead:
curl -sfL https://get.k3s.io | sh -s - agent \
  --server https://192.168.20.11:6443 \
  --token <token>
Agents run workloads and hold no etcd. Add as many as you can afford and none of them can slow down consensus — which is the whole point of the split.
This is also where two of the things I left out start to earn their place. With workloads living on agents, taint the servers so user pods stay off the control plane — K3s takes --node-taint CriticalAddonsOnly=true:NoExecute for exactly this — and kube-vip becomes worth the trouble, because now there is a fleet of machines and your kubeconfig should not name one of them in particular. One Longhorn detail that catches people: not every agent has to be a storage node. Label the ones with real NVMe in them and keep replicas scheduled there, rather than on the cheap box you bought for compute.
Then go hybrid — two clusters, not one stretched one
"Hybrid cloud" at this scale usually gets attempted the wrong way round: rent a VM, join it to the home cluster as a fourth node, feel clever. What you have actually built is a consensus group with the public internet in the middle of it. etcd is fsync- and round-trip-bound — the same reason the old desktop needs an NVMe and the nodes are on cable rather than Wi-Fi, except that a WAN link is an order of magnitude worse than either. Do not stretch a control plane across a link you do not own.
The version that works is two clusters and one description of them. Stand up a second K3s cluster in a cloud — or a colo, or the other end of a family VPN — and point the same ArgoCD repository at both. This is where constraint four quietly pays for itself: if the cluster really is reproducible from Git, the second one is a directory in a repo and an afternoon, not a project. Then split the workloads by where they want to live:
- At home. Anything with data gravity, anything whose cost is dominated by CPU-hours you have already paid for — CI runners, batch jobs, indexing, the model you are experimenting with this month.
- In the cloud. Anything that has to keep serving while you are moving furniture past the switch, and anything whose availability you have promised to someone else in writing.
The seam between them is Cloudflare, and this is where the outbound-tunnel decision pays a dividend nobody expects at three nodes: both sites are reached in exactly the same way, so from the internet's point of view there is no "home" and no "cloud" — there are two origins behind one hostname. Cloudflare's guidance for this is one tunnel per site and one load-balancer pool per tunnel, which puts health checks, steering and failover at the edge instead of in DNS behind a TTL you have to sit and wait out. Load Balancing is a paid add-on starting at $5 a month — roughly the moment a home lab stops being a hobby budget, and a good moment to ask whether you needed it yet.
It does not have to be symmetrical, either. A single-node cloud cluster whose entire job is to keep serving a status page while the flat has no power is a perfectly legitimate hybrid.
This is also the honest answer to the SLA question, and it is worth keeping separate from the reliability one. Three nodes in a flat are genuinely more available than a single cloud VM — quorum arithmetic does not care where the machines are. What the flat cannot give you is a commitment: one uplink, one power meter, one landlord, and nobody on call but you. An availability number you can put in a contract needs a second failure domain and somebody else's on-call rota behind it. That is why the SLA lives at the edge rather than in the basement — the load-balancer pool keeps answering while one origin is dark.
Which brings in the number that enterprise-ready writing usually skips entirely: anyone can hit four nines with an unlimited budget. The interesting problem is the cheapest architecture that still meets the commitment you signed — and every rung of this ladder you do not have to climb yet is margin.
Sprinkle Cloudflare in wherever it takes work off the cluster
The best scaling move is often not adding a node. It is not sending the work to one in the first place. Three services worth wiring in, in the order I would do it:
- Cache at the edge. Every request through the tunnel already crosses Cloudflare's network, so caching is a configuration decision rather than an architectural one. Cache Rules — ten of them on the free plan — let you mark paths as cacheable and set an edge TTL, including for things that merely look dynamic. A cache hit never crosses the tunnel, never reaches a node, and never spends your upstream bandwidth, which on a residential line is the scarcer resource by some distance.
- R2 for object storage. This is the "put the S3 layer where it belongs" point from earlier, made concrete. Longhorn accepts any S3-compatible backup target — credentials plus an AWS_ENDPOINTS value in a secret — and R2 works as one. Standard storage is $0.015 per GB-month with 10 GB-month free and no egress fees, and that last part is the number that actually matters: on the day you need the backup, pulling several hundred gigabytes back down your own line costs nothing but time. The same bucket on a custom domain is also where user uploads and media belong — served and cached from the edge instead of from a mini PC in a cupboard.
- Access in front of everything internal, not just Grafana. It costs nothing up to 50 users, and the marginal work for each new service is a policy rather than an auth integration. Once you have more dashboards than you can remember, that is the difference between SSO and a bookmarks folder full of passwords.
Sprinkle is the right word for it. Each of these hands a piece of your platform to somebody else's, and every one you add is a dependency the cluster cannot reconcile its way out of if it goes away. For caching and for backups that trade is clearly worth making — the data still exists at home either way. Think considerably harder before anything lives only up there.
The ladder, then: fill the boxes, then add agents, then add a second cluster, and let the edge absorb whatever it can. Every rung leaves the earlier decisions intact — still three servers, still one repository, still nothing forwarded through the firewall. Enterprise-ready was never about the size of the hardware. It is about whether you can commit to an SLA and keep it — and whether the next step up is an upgrade or a rewrite. The commitment is what customers buy; the cost of keeping it is what decides whether the business works. The finance-side version of that same question — why the IT bill so often lands on the wrong desk — gets its own answer.
Key takeaways
- Three nodes, all servers. Embedded etcd needs an odd number; two servers tolerate zero failures and cost you a second machine for nothing.
- Skip the Pi for cluster nodes. Architecture consistency and NVMe are worth more than the price difference, and a used Ryzen mini PC is barely a price difference.
- Invert the connection. An outbound tunnel removes the entire inbound attack surface, works behind CGNAT, and brings free SSO for internal dashboards with it.
- Run the tunnel in the cluster, not on the firewall. pfSense has no official cloudflared package and the request has sat open since 2023 — keep the edge device boring.
- Give the firewall the job it is good at: VLAN segmentation, default-deny egress, split-horizon DNS.
- Replication is not backup. Longhorn survives a dead disk. It replicates a bad
kubectlcommand just as faithfully. - Cost the electricity, not just the purchase. Between roughly CHF 75 and CHF 325 a year in Switzerland depending on your municipality — and the free node burns most of it.
- Grow it in order. RAM first, then agent nodes, then a second cluster joined at the edge. Extra servers buy write latency rather than availability, and a control plane stretched over a WAN link buys neither.
- An SLA is a commitment, not a machine count. Availability you can put in a contract needs a second failure domain and somebody else's on-call rota — and the craft is buying the cheapest one that still meets the number you signed.
The point of a build like this is not that it is cheap. It is that the constraints are real: quorum arithmetic behaves the same on three mini PCs as on three cloud instances, and a storage system that has never lost a node has never been tested. Cheap is what makes it possible to break things on purpose.
More of this? Subscribe — the next one puts Qwen3.8-27B on home hardware and works out what it really costs.